Mastering Excel Borders: A Comprehensive Guide for a Polished Spreadsheet
Introduction: Creating an organized and professional-looking spreadsheet is crucial for effective data presentation. One key element in achieving this is mastering the art of applying borders in Microsoft Excel. In this comprehensive guide, we will explore step-by-step instructions on how to apply all borders in Excel, customize them to suit your preferences, and offer additional tips to enhance your formatting skills.
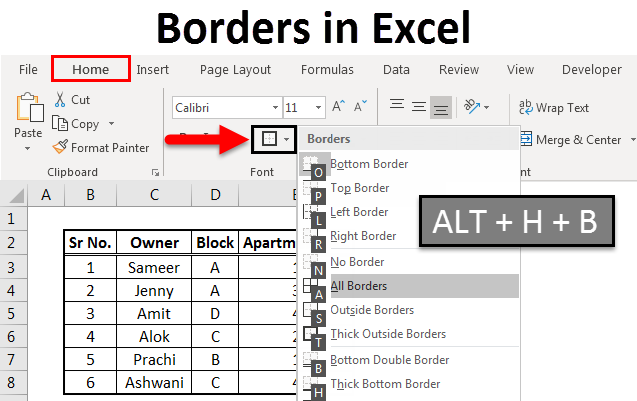
Step 1: Selecting Cells to Add Borders To Begin by selecting the cells where you want to apply borders. You can do this by clicking and dragging your mouse over the desired cells or holding down the Shift key while clicking on the first and last cell in your range.
Step 2: Opening the Format Cells Dialog Box Right-click on the selected cells and choose the “Format Cells” option. This action will open the Format Cells dialog box, providing you with a range of customization options for your data.
Step 3: Adding All Borders Within the Format Cells dialog box, navigate to the “Borders” tab and click on the “All Borders” button. This will apply borders to all sides of the selected cells. To further customize, use the “Line Style” dropdown to choose the line style that suits your preference.
Step 4: Choosing a Color for Borders For a more visually appealing presentation, you can add color to your borders. Click on the “Color” dropdown and select the desired color. Adjust the width of the border by using the “Width” dropdown to enhance or reduce thickness.
Step 5: Previewing and Applying Changes Before finalizing your choices, click the “Preview” button to see how your selected borders will look. If satisfied, click “OK” to apply the changes. If not, click “Cancel” to go back and make adjustments.
Step 6: Saving Changes Once satisfied with your formatting, save your changes by clicking on the “File” menu and selecting “Save.” This ensures that your customized borders become a permanent part of your workbook.
FAQs:
- What is the easiest way to apply all borders in Excel?
- The easiest method is to use the “Format as Table” command in the Home tab. This command streamlines the process, allowing you to choose a style and apply borders effortlessly.
- What are the different types of borders available in Excel?
- Excel provides various border styles, including solid, dashed, double, and more. Additionally, you can customize color, line style, width, and corner types.
- How do I remove all borders in Excel?
- To remove all borders, select the desired range, go to the “Borders” button, and choose “No Border” from the drop-down menu.
- Can I apply different border styles to different parts of the same selection of cells?
- Yes, you can. Use the “Format Cells” dialog box to select different border styles for each side of the cell selection.
- Can I apply borders to an entire worksheet?
- Certainly. Select the entire worksheet, click the “Borders” button, and choose your preferred border style to apply it to the entire sheet.
Conclusion: Mastering the application of borders in Excel is a valuable skill for creating visually appealing and organized spreadsheets. By following these step-by-step instructions and exploring customization options, you can elevate the professionalism of your Excel documents, making data more accessible and visually engaging.
Tags: Excel borders, spreadsheet formatting, Microsoft Excel tips, data presentation, Excel customization.
BEST SELLING PRODUCTS
-
Product on sale
 Windows 11 Professional for 1 PC – RetailOriginal price was: $249.$5Current price is: $5.
 -
Product on saleWindows 10 Professional for 1 PC – RetailOriginal price was: $249.$5Current price is: $5.
-
Product on saleGenuine Office 2019 Professional Plus NOT BindOriginal price was: $249.$27Current price is: $27.
-
Product on saleMicrosoft Windows 10 / 11 Pro – OEMOriginal price was: $178.$12Current price is: $12.
-
Product on saleOffice 2021 Professional Plus License for Windows NOT Bind to MS AccountOriginal price was: $259.$42Current price is: $42.
-
Product on saleGenuine Office 2021 Professional Plus for Windows PC / Laptop – Phone ActivationOriginal price was: $259.$8Current price is: $8.
-
Product on saleOffice 2021 Professional Plus License for Windows For 5 PC / Laptop / Device NOT Bind to MS AccountOriginal price was: $259.$59Current price is: $59.
-
Product on saleWindows 10 Professional or Windows 11 Professional Genuine License key can be used on 5 PC or devicesOriginal price was: $249.$27Current price is: $27.
-
Product on saleMicrosoft Office 2021 Home & Business product key -Lifetime Activation for Mac OS (1MAC)Original price was: $249.$49Current price is: $49.